Are you considering installing plumbing in your shipping container? Before you dive in, it’s important to know the do’s and don’ts.
In this article, we’ll guide you through the basics of container home plumbing and provide important steps to take before you begin.
From understanding sewer line slopes to adhering to local building codes, we’ll help you navigate the process with confidence.
So let’s get started on your journey to successful shipping container plumbing installation!
The Rise of Container Homes as an Alternative Housing Option
To understand the rise of container homes as an alternative housing option, it’s important to explore the unique benefits and challenges they present.
Shipping container architecture has gained popularity due to its affordability, sustainability, and versatility. Container homes offer an innovative solution to the increasing demand for affordable housing while also reducing the environmental impact of traditional construction methods.
The installation of plumbing in shipping container homes can be a complex process, requiring a lot of careful planning and expertise. However, with proper design and execution, container homes can provide all the necessary amenities for comfortable living.
The rise of container homes as an alternative housing option reflects a growing desire for creative and sustainable living solutions. As more people become aware of the benefits and possibilities of container homes, the trend is expected to continue to rise.
Container Home Plumbing Basics
When installing plumbing in a shipping container home, you need to consider the basics to ensure a functional and efficient system. Plumbing installation in container homes can be a bit different than traditional houses due to the unique structure of the shipping containers.
One of the most important things to consider is the layout of the house and plumbing system. You need to carefully plan the placement of pipes and fixtures to maximize the available space in the container home.
It’s also crucial to insulate the pipes properly to prevent freezing during colder months. Additionally, you should be mindful of water pressure and drainage to avoid any potential leaks or clogs.

First Steps
Before you can begin installing the shipping container plumbing, it’s important to carefully plan out the layout and design of your plumbing system. The first step is to determine the location of your plumbing fixtures, such as sinks, toilets, and showers. Consider the size and layout of your shipping container to ensure efficient use of space.
Next, you need to decide on the type of plumbing materials you’ll use. PVC pipes are commonly used for shipping container plumbing due to their durability and cost affordability. Additionally, make sure to measure and cut the pipes accurately to avoid leaks or blockages.
Lastly, don’t forget to check local building codes and regulations to ensure compliance with the installation process. By following these first steps, you can lay a solid foundation for a successful shipping container plumbing installation.
Drilling Holes For Plumbing
To properly install shipping container plumbing, it’s essential to carefully drill holes for the plumbing system, ensuring efficient water flow and preventing any potential leaks or blockages.
When installing plumbing in a container house, drilling holes for the pipes is a critical step. Start by planning the layout of your plumbing system, taking into consideration the location of your bathroom and the fixtures you’ll be installing. Once you have determined the placement of the pipes, mark the spots where the holes need to be drilled.
Use a drill bit that’s suitable for the material of the container walls, such as metal or steel. Make sure to drill the holes at the correct angle to allow for proper water flow. After drilling the holes, inspect them to ensure there are no sharp edges or burrs that could damage the pipes.
Considerations for Efficient Plumbing Layout, Focusing on Bathroom and Kitchen Proximity
When planning the layout for efficient shipping container plumbing, consider the proximity of the bathroom and kitchen to ensure convenient access and functionality. This is crucial for optimizing the plumbing system in your shipping container.
By strategically placing the bathroom and kitchen close to each other, you can minimize the length and complexity of the plumbing lines, reducing the risk of leaks and improving overall efficiency. Having the bathroom and kitchen in close proximity also enhances convenience, especially when working in small spaces. It allows for easy access to water sources and drainage systems, making it more convenient for daily activities such as cooking, cleaning, and personal hygiene.
Additionally, a well-designed layout ensures that hot water reaches both areas quickly, further enhancing efficiency and comfort. Take the time to plan your plumbing layout carefully, considering the proximity of the bathroom and kitchen, to create a functional and efficient living space even in your shipping container.
Connecting to the Main Water Line
To connect your shipping container plumbing to the main water line grid, you’ll need to use a suitable connector and ensure proper alignment for a secure and efficient connection.
When installing your plumbing system, it’s crucial to follow a few do’s and don’ts to ensure a successful connection.
Firstly, do ensure that the connector you choose is compatible with both the shipping container plumbing and the main water and power line. This will prevent leaks and potential damage.
Secondly, don’t forget to properly align the connector with the wall and main water line to create a tight seal. This will prevent any water loss and ensure an efficient flow.
Taking these precautions will result in a reliable and effective connection between your shipping container plumbing and the main water line.
Techniques To Ensure Secure Connections and Prevent Leaks
Ensure secure connections and prevent leaks by using proper techniques when connecting your shipping container plumbing to the property or main water line.
When installing the plumbing in your shipping container, it’s crucial to follow the right techniques to ensure a watertight connection.
Firstly, make sure to use high-quality fittings and connectors that are specifically designed for shipping container plumbing. These fittings should create a secure seal that prevents any leaks.
Secondly, use thread seal tape or thread sealant to further enhance the connection between pipes and fittings. This will help to prevent any water from seeping through the joints.
Lastly, tighten all connections properly using the appropriate tools, such as a wrench or pliers. Be careful not to overtighten, as this can damage the fittings and cause leaks.
Checking The Connections
Now, let’s make sure your connections are secure and leak-free.
When installing shipping container plumbing, checking the connections is crucial to ensure proper functioning. Start by inspecting all the connections for any signs of leakage or loose fittings. Tighten any loose connections using adjustable wrenches, making sure not to overtighten and damage the plumbing components.
Additionally, it’s recommended to use thread seal tape or pipe joint compound on threaded connections to create a watertight seal.
After securing all the lines and connections, turn on the water supply and check for any leaks. Pay close attention to areas where the plumbing pipes connect to the container walls or floor. If any leaks are detected, promptly address them by rechecking the connections and applying additional sealant if necessary.
The Sewer Line
Inspect the sewer line for any signs of damage or blockage. When it comes to the plumbing installation in a shipping container, the sewer line plays a crucial role in ensuring proper waste disposal.
Before proceeding with any plumbing work, it’s essential to thoroughly examine the sewer line to identify any potential issues. Look for cracks, leaks, or clogs that may hinder the flow of waste. Addressing these problems before installation will save you time and money in the long run.
Additionally, ensure that the sewer line is properly connected to the main sewage system or septic tank.
Following these do’s and don’ts will help you avoid future headaches and maintain a functional and efficient plumbing system within your shipping container.
Understanding the Correct Slope for Sewer Lines and the Placement of Clean-Outs
When installing shipping container plumbing, it’s important to understand the correct slope for sewer lines and the placement of clean-outs.
The slope of sewer lines is crucial for proper drainage and preventing blockages. The ideal slope for residential sewer lines is 1/4 inch per foot, which allows for efficient flow of waste and prevents the accumulation of debris. In shipping container plumbing installation, it’s essential to ensure that the slope is consistent throughout the entire length of the line.
Additionally, clean-outs should be strategically placed along the sewer lines to allow for easy access and maintenance. Clean-outs serve as access points for clearing clogs or performing inspections. Proper placement of clean-outs ensures that any potential issues can be addressed efficiently, saving you time and money in the long run.
Importance of Adhering to Local Building Codes for Sewer Line Installation
To ensure a compliant and safe sewer line installation, it’s crucial that you adhere to the local building codes in your area. These codes are put in place to ensure that the installation of the sewer line meets the necessary standards and regulations.
When it comes to pipe plumbing and installation, following the local building codes is of utmost importance. These codes outline specific requirements for the materials used, the layout of the sewer line, and the methods of installation. By adhering to these codes, you can ensure that your sewer line is installed correctly and safely.
Failure to comply with the local building codes can result in fines, penalties, and even the need for costly repairs in the future. Therefore, it’s essential to consult with local authorities and obtain the necessary permits before proceeding with the installation of your sewer line.
Plumbing Emergencies
In the event of a plumbing emergency in a shipping container home, it’s crucial to act swiftly to minimize damage. Start by identifying the issue, whether it’s a leak, clog, or a malfunctioning fixture. Immediately shut off the main water supply to prevent further damage; this valve is usually located near the water meter or where the main line enters the home.
For minor clogs, use a plunger or a plumber’s snake, and for small leaks, temporary fixes like plumber’s tape or epoxy putty can be effective. It’s also important to quickly address any water damage by moving furniture, rugs, and electrical items away from the affected area and using towels or buckets to contain the water. In cases where the problem is beyond basic fixes, don’t hesitate to call a professional plumber to ensure a proper and safe resolution.
Frequently Asked Questions
How do you put a toilet in a shipping container?
Installing a toilet in a shipping container involves a few critical steps. Firstly, you need to decide on the toilet’s location within the container. Depending on your plumbing setup and the design of the container home, the toilet can be installed either on the floor level or on a raised platform. If the toilet is placed at the floor level, a hole needs to be made in the bottom of the container, leading directly to the septic tank. This setup is more permanent and suitable for stationary container homes.
Alternatively, if you plan to move the container frequently, elevating the toilet on a platform is a better option. In this case, the waste pipe would exit out the side of the container. This method allows for more flexibility in moving the unit, as the plumbing is less integrated into the container’s structure. Both methods require careful planning and consideration of the container home’s overall layout and mobility.
How does a shipping container roof drain?
Shipping container roofs are designed with rain and water drainage in mind. Most shipping containers feature small gaps that facilitate water drainage. However, the effectiveness of these drainage systems largely depends on regular maintenance. Similar to home gutters, these gaps can become clogged with leaves and debris over time, which can impede proper drainage.
Therefore, it’s crucial for shipping container owners to regularly clean and maintain these drainage areas to ensure effective water runoff. This maintenance is essential to prevent water accumulation and potential damage to the container roof.
How watertight are shipping containers?
Shipping containers are generally watertight, thanks to their robust construction and design. The core structure of a standard shipping container is a steel box, typically made from materials like high-quality corten steel, which is known for its durability and resistance to weather elements. This construction ensures that shipping containers can withstand a great deal of transportation while effectively protecting their contents from water and wind.
Most new shipping containers are also equipped with durable rubber seals around their doors, which play a crucial role in preventing water from seeping inside. These features make shipping containers reliable for transporting goods across long distances, including over oceans, as they can resist water ingress and protect the contents from environmental factors.
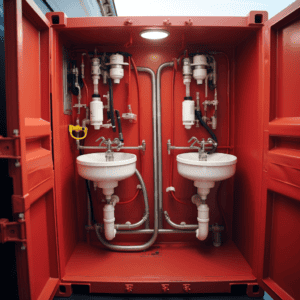
Do shipping container homes have bathrooms?
Yes, shipping container homes can have bathrooms. These homes are designed to include all the essential amenities, including fully functional bathrooms. The process of installing a bathroom in a shipping container home involves integrating plumbing systems, which can include flushable toilets and sinks with running water.
The design and layout of the bathroom are typically dictated by the overall design of the shipping container home and the homeowner’s personal preferences. This means that bathrooms in shipping container homes can be customized to various styles and specifications, just like in traditional homes. The inclusion of bathrooms in these homes highlights their versatility and ability to provide complete living solutions.
Conclusion
Make sure to follow these guidelines to ensure a successful and compliant installation of your shipping container plumbing.
By adhering to the do’s and don’ts discussed in this article section, you can avoid common mistakes and create a functional plumbing system within your shipping container.
Remember to plan the layout carefully, considering the location of fixtures and the flow of air and water. Use appropriate materials and fittings, ensuring they’re compatible with the container’s structure and the local building codes.
Pay attention to proper insulation and ventilation to prevent freezing or condensation issues. Regular maintenance and inspection are crucial to identify and address any potential leaks or clogs promptly.
Lastly, it’s essential to consult with professionals when needed to ensure proper installation and compliance with regulations.
Following these guidelines will help you achieve a successful shipping container plumbing installation.


